I have been sooo excited to make these rings since I bought the stones back in April. I just now finally had time to actually sit down and figure it out! At the beginning of this year, I started noticing these stone rings a lot- and I really loved them! But when I first saw pictures of them, I thought- I could totally just make those. So when Ryan and I were in Peru and a little lady was selling turquoise and quartz stones, I had to buy them. And then Ryan bought the silver thin wire and surprised me with it so that I could make the rings! So I finally made them, and I LOVE them. Seriously so easy to make and they just look really cool haha.
MATERIALS: - Pliers (these just really help wrap the wire tightly) - Stones (honestly this can be kinda tricky to find... I know you can buy some on Amazon or Ebay... it just might take some searching to find a price where you're not buying a bulk of stones- or you could and then make super cool rings and sell them) - Wire (Craft stores will have silver or gold thin wire like this- personally I think the gold would look really good)
1. Stretch the wire out (to measure it out, I loosely wrap the wire around my finger about 5 times and then use the pliers to cut it)
2. Starting from the middle, wrap the wire twice into a circle. To keep the circle in place, wrap the wire ends around the middle once on each side (like in the picture). Make sure to slip it on your finger a couple times in the process to make sure the size is right.
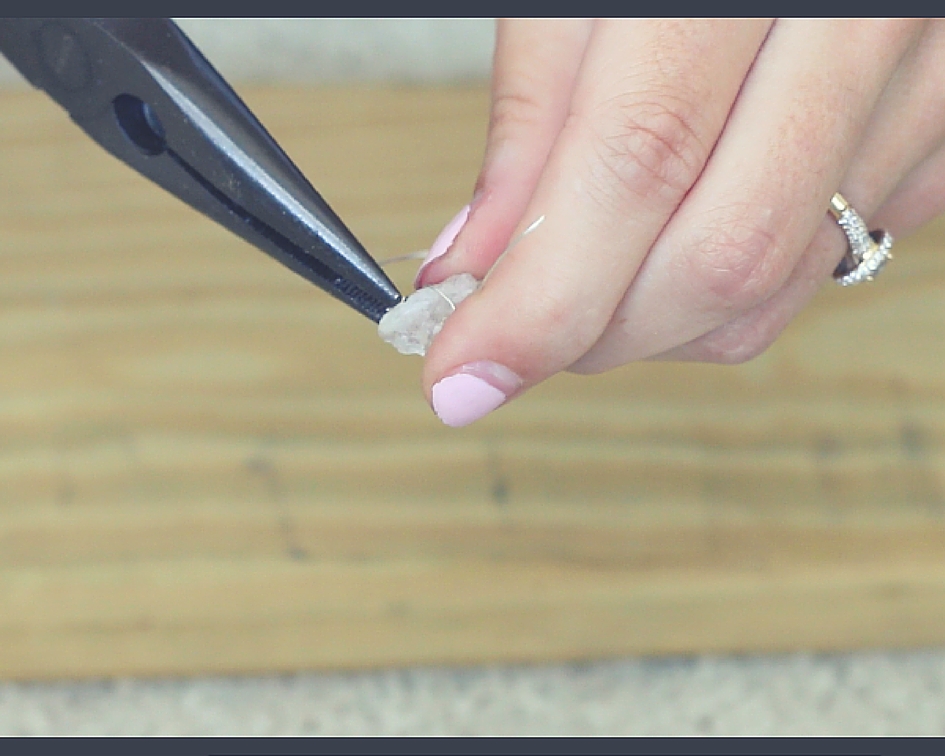
3. Place your stone in the middle. Starting with one side, wrap the wire around the stone and then using the pliers, wrap the rest of the wire in a coil around the wire circle to keep the stone in place. Then clamp the end of the wire down with the pliers so that the ring won't poke ya.
4. Do the same with the other side- and then you are done!
Moving into a new apartment is really fun because everything is just blank space that I get to design. I've been looking forward to this for 8 months. I'm excited to finally have a home! After unpacking all our boxes and finding homes for everything, I realized that I have a lot of really blank walls... and unblanking them will take a lot of time- and after researching, will not be the cheapest.
Yes, there are a lot of free, cute prints that you can print off of Pinterest, and I am sure I will do that eventually, but I also wanted some better quality prints that won't break my decorating budget. SO I remembered that I got this calendar for Christmas. It is a Rifle Paper calendar with huge prints inside. And they are darling. The calendar itself wasn't that expensive (and you can get them even cheaper if you buy them later on in the year cause they are discounted)- and you get 12 prints! Really it's a steal. So I cut my calendar up, and made the most adorable wall prints out of them.
Here is the video tutorial I made for these prints if you are interested in watching.
Materials Needed:
-Calendar
-Frames (these are cheapo frames from Ikea- I know you can also get pretty cheap ones from Hobby Lobby)
- An exacto knife if you need to trim your mat like I did
-Spray paint of your choice if you don't like the color of the frames like I didn't
INSTRUCTIONS:
1. Disassemble the frames so you just have the actual frame in hand (take out the mat and glass)
2. If you so desire, spray paint the frames (I highly recommend the metallic gold)
3. While your frames are drying, take your calendar and rip out the prints you want to frame.
4. If your frames came with a mat- measure the mat around the print- if the mat is too large and you want more of the print to show- take an exacto knife and using a straight edge, carefully enlarge each side by just a little bit until you reach the desired size. (It will depend on the size of frames whether you need a mat or not- mine are pretty big frames- 12 by 15 I think.. so I needed the mat- but you definitely don't need them if your frames are smaller!)
5. Once the mat fits around the print to your liking, trim to excess paper from the print (in my case the calendar part) so that everything fits behind the mat.
6. Make sure your frames are dry, and then just assemble your print!
Before moving to Texas, Ryan and I did this shoot out at a nature preserve in Utah. It was a perfect summer evening, and I can't really pass up nature walks, especially when there are boardwalks involved. I have been seeing a lot of posts lately about "ahh summer is ending"- and to be honest, you don't really get that feeling in the 103 degree Texas sun. BUT today I walked outside and felt a lovely breeze and didn't feel like I was swimming to my car and thought I could use a light sweater- it was the darnedest- and was probably just freaky weather (pulling a Utah weather or something), but nonetheless, I decided that I should post this before I wake up one day to Fall.
current favorite shoes- so cute and so comfy
.................................................... shirt: Loft- similar here

 I have been sooo excited to make these rings since I bought the stones back in April. I just now finally had time to actually sit down and figure it out! At the beginning of this year, I started noticing these stone rings a lot- and I really loved them! But when I first saw pictures of them, I thought- I could totally just make those. So when Ryan and I were in Peru and a little lady was selling turquoise and quartz stones, I had to buy them. And then Ryan bought the silver thin wire and surprised me with it so that I could make the rings! So I finally made them, and I LOVE them. Seriously so easy to make and they just look really cool haha.